How do you choose a suitable contour?
Table of Contents

Introduction to Contour
What is Contour?
Purpose of Contour in Makeup
Benefits of Using Contour Products
- Enhanced Definition: Contour products help in defining and accentuating features like cheekbones, jawlines, and noses, providing a more structured appearance.
- Customization: Individuals can tailor their contouring routine to suit their facial structure and preferences, achieving a personalized look.
- Versatility: Contour products come in various forms such as creams, powders, and liquids, catering to different skin types and textures.
- Photogenic Results: When done correctly, contouring can make faces look more photogenic by balancing facial proportions and highlighting attractive features.

Understanding Different Types of Contour Products
Cream vs. Powder Contour
Pros and Cons of Cream Contouring Products
Pros:
- Blendability: Cream contour blends effortlessly into the skin, creating a seamless and natural look.
- Hydration: The creamy texture often contains moisturizing elements, beneficial for individuals with dry skin.
- Natural Finish: Provides a subtle and natural-looking contour due to its creamy consistency.
Cons:
- Oily Skin Concerns: Could feel heavy or contribute to shine for individuals with oily skin types.
- Potential Smudging: May require setting with powder to prevent smudging or movement throughout the day.
Pros and Cons of Powder Contouring Products
Pros:
- Matte Finish: Powder contour provides a matte finish that’s suitable for oily or combination skin types.
- Longevity: Tends to stay put longer and is less prone to smudging compared to cream contour.
- Buildable Coverage: Allows for layering to achieve desired intensity without looking cakey.
Cons:
- Less Blendable: May require more effort to blend compared to cream contour.
- Potential Dryness Emphasis: Might accentuate dry patches or appear less natural on dry skin types.
Liquid Contour Options and Their Application

Identifying Your Skin Type and Undertone
Importance of Skin Type in Choosing Contour
Assessing Skin Type: Oily, Dry, Combination
- Oily Skin: People with oily skin tend to have excess sebum production, which can affect the longevity and appearance of contour products. Powder contours are often preferred for oily skin as they help control shine and provide a matte finish.
- Dry Skin: Dry skin lacks moisture and might benefit from cream contours that offer hydration and a dewy finish. Creams can blend easily without emphasizing dry patches.
- Combination Skin: This skin type can have both oily and dry areas. People with combination skin might opt for versatile contouring products like liquids, which can work well on different skin textures without emphasizing either extreme.
How Undertones Influence Contour Shade Selection
- Cool Undertones: Those with cool undertones often have pinkish or bluish hues in their skin. They may prefer contour shades with taupe or ashy undertones to create shadows that mimic natural shadows on their skin.
- Warm Undertones: Individuals with warm undertones typically have yellow, peachy, or golden hues in their skin. Contour shades with warmer, bronze tones work well to create definition without appearing too stark or cool.
- Neutral Undertones: Those with neutral undertones can pull off a wide range of contour shades, including those with a mix of warm and cool tones. They have the flexibility to experiment with various shades to find what suits them best.

Selecting the Right Contour Shade
Matching Contour Shades to Your Skin Tone
Cool-toned vs. Warm-toned Contour Products
- Cool-toned Contours: These products typically have ashy or taupe undertones, ideal for individuals with fairer skin or those with cool undertones. They create natural-looking shadows without appearing too warm or orangey on the skin.
- Warm-toned Contours: Contours with warmer, bronze hues work well for individuals with medium to deep skin tones or those with warm undertones. These shades provide depth and definition without looking too cool or ashy.
Tips for Choosing the Correct Contour Shade
Know Your Undertone: Understanding whether you have warm, cool, or neutral undertones can guide you in choosing a contour shade that complements your skin’s natural hues.
Test Before Buying: Try swatching contour shades on your jawline or cheek to see how they blend with your skin. Natural light can also help in determining if the shade matches well.
Consider Intensity: If you’re new to contouring, start with a shade that’s only slightly darker than your natural skin tone. Gradually build up to deeper shades for more dramatic effects.
Blendability Matters: Opt for contour products that are easy to blend. This ensures a seamless application and prevents harsh lines or patchiness.
Adapt to Occasion: Contour shades might vary depending on the occasion. For daytime or natural looks, choose lighter shades, while deeper shades work well for evening or more intense makeup styles.
Consult Professionals: Don’t hesitate to seek advice from makeup artists or beauty experts, especially when uncertain about the right shade. They can provide valuable insights based on your skin’s unique characteristics.
Factors to Consider When Choosing Contour Products
Texture and Finish of Contour Products
The texture and finish of contour products play a pivotal role in achieving the desired makeup look. Different textures—such as creams, powders, or liquids—offer varied finishes that cater to diverse preferences and skin types.
- Cream Contours: Creamy textures provide a smooth and blendable application, resulting in a more natural and dewy finish. They are suitable for those with dry or normal skin, as they offer hydration and seamlessly meld into the skin for a subtle contour effect.
- Powder Contours: Powder textures deliver a matte finish and work exceptionally well for individuals with oily skin. They offer a lightweight feel and are great for controlling shine. However, they might require more effort to blend than creams and are preferred by those seeking a more defined look.
- Liquid Contours: Liquid textures offer versatility and precise application. They can work across different skin types, but they demand more expertise in blending to avoid streaking. Liquids often dry down to a matte or satin finish, providing a subtle yet buildable contour effect.
Longevity and Wearability
The longevity and wearability of contour products are essential considerations, especially for all-day wear or special occasions. Factors affecting longevity include the formulation, skin type, and weather conditions.
- Creams: They might require setting with powder for extended wear. They tend to work better in cooler climates or for shorter durations.
- Powders: Generally have better staying power, especially on oily skin. They’re suitable for longer wear and hold up well in humid conditions.
- Liquids: Their lasting power depends on the formula and how well they’re set. They might require touch-ups throughout the day for optimal wearability.
Ingredients to Look for or Avoid
Checking the ingredient list is crucial to avoid potential skin irritants or breakout triggers. Look for contour products formulated with non-comedogenic ingredients, especially if you’re prone to acne. Avoid products containing harsh chemicals or fragrances that could cause skin sensitivity.
- Beneficial Ingredients: Opt for products containing hydrating elements like hyaluronic acid or skincare-infused ingredients such as vitamins or antioxidants.
- Avoid Harsh Chemicals: Stay away from products containing parabens, sulfates, or mineral oils, as they might cause skin irritation or clog pores.

Tools and Techniques for Contour Application
Essential Tools for Contouring
Brushes vs. Sponges: Which to Use?
Step-by-Step Contouring Techniques
Prepare Your Base: Start with a well-moisturized and primed face before applying foundation. This provides a smooth canvas for contouring.
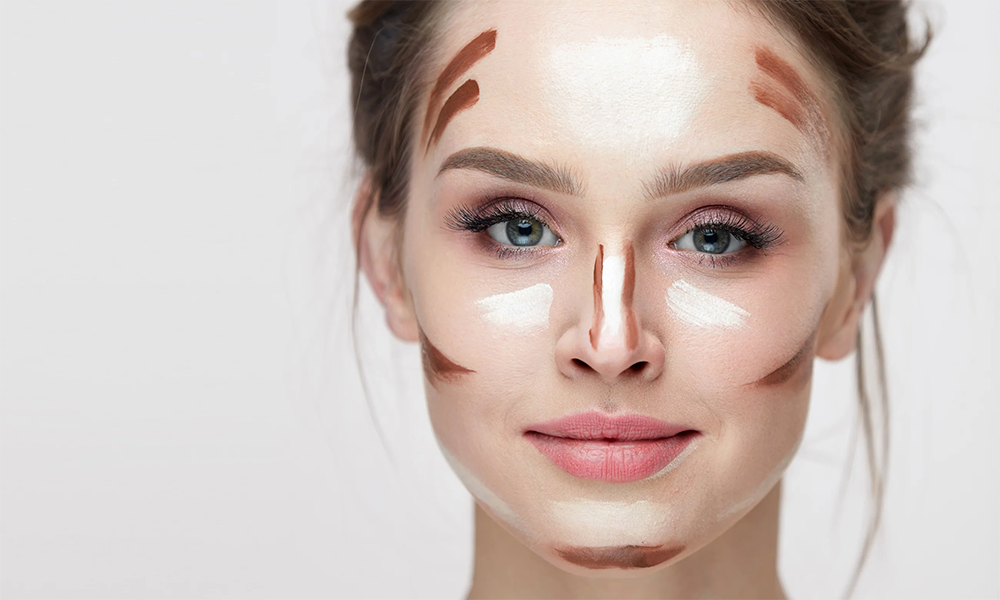
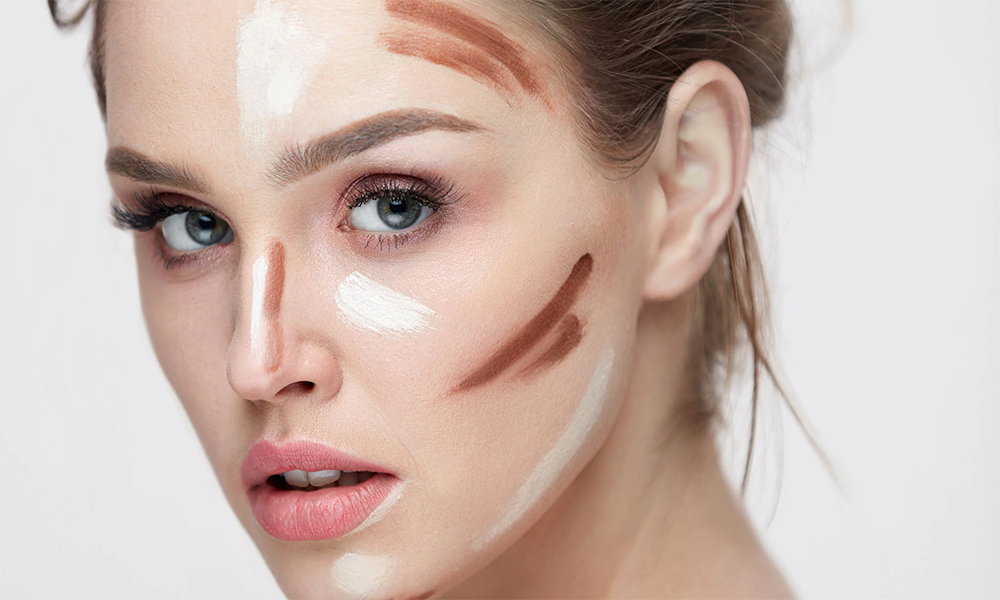
Identify Areas to Contour: Locate the hollows of your cheeks, sides of the nose, jawline, and forehead hairline as key areas for contour application.
Choose the Right Shade: Select a contour shade that is slightly darker than your natural skin tone but not too harsh or muddy.
Apply and Blend: Using your chosen tool—brush, sponge, or fingers—apply the contour product along the areas you want to define. Blend in gentle, tapping or sweeping motions to avoid harsh lines.
Build Gradually: Start with a small amount of product and build it up gradually to avoid overdoing the contour.
Highlight and Set: Follow up with highlighting the high points of your face—cheekbones, bridge of the nose, brow bone—with a lighter product to contrast the contour. Set your makeup with a setting powder for longevity.
Blend Again (if needed): After completing your entire makeup look, blend everything once more to ensure a seamless finish.

Tips for Beginners
Simplified Contouring for Newbies
Common Mistakes to Avoid
- Going Overboard: Using too much contour product initially can result in a heavy or unnatural appearance. Begin with a small amount and build up gradually.
- Wrong Shade Selection: Choosing a contour shade that is too dark or too warm for your skin tone can make your contour look muddy or unnatural. Opt for a shade slightly darker than your natural skin tone for a subtle effect.
- Blending Issues: Inadequate blending can leave visible lines or patches on your face. Spend time blending carefully to achieve a seamless finish.
- Ignoring Face Shape: Not considering your face shape when contouring can lead to misplacement of shadows and highlights. Tailor your contouring technique to your unique face shape for the best results.
Practice Tips for Perfecting Your Contour
- Start Light: Begin with cream or powder contours that are easier to work with. Practice in natural light to see how the product looks on your skin.
- Follow Tutorials: Watch beginner-friendly tutorials from makeup artists or beauty vloggers to understand contouring techniques better.
- Use Guidelines: Utilize makeup stencils or guidelines for placing contour and highlight products until you get comfortable with the technique.
- Practice, Practice, Practice: The key to mastering contouring is consistent practice. Experiment with different tools and techniques to find what works best for you.
FAQs About Contouring Products
Answering Common Queries About Contour
How Often Should You Contour?
Can Contouring Products Cause Skin Issues?
Conclusion: Choosing the Right Contouring
Contouring, when done thoughtfully and with the right products, can transform your makeup routine and enhance your natural beauty. Here are some key takeaways to ensure you pick the perfect contour products:
Understanding Your Skin: Knowing your skin type and undertone is fundamental in choosing the right contour shade and texture. This knowledge helps in achieving a seamless and flattering contour.
Experimentation is Key: Don’t hesitate to experiment with different contour shades, textures, and application techniques. What works for others might not necessarily be the best for you, so try and find your perfect match through trial and error.
Quality Over Quantity: Invest in quality contour products that suit your skin type. While there are various affordable options, prioritize quality ingredients to avoid potential skin issues.
Blending is Everything: The secret to a natural-looking contour lies in blending. Take your time to blend the product thoroughly for a flawless finish without harsh lines.
Practice Makes Perfect: Like any skill, mastering contouring takes practice. Don’t get discouraged if it doesn’t seem perfect right away. Keep practicing and refining your techniques.
Skincare Matters: Prioritize skincare by cleansing and moisturizing before and after applying makeup. Proper skincare ensures a smooth canvas for contouring and keeps your skin healthy.
Related FAQ
What are contour makeup products?
How do I choose the right contour product shade?
How do I determine the contour products' texture that suits me?
How do I choose suitable contour tools?
How do I use contour products correctly?
Related Products
No products were found matching your selection.


