Fake skin may look spooky and fun, but it is also part of a long tradition in special effects makeup. On Halloween, people use it to create scars, cuts, or other strange textures. Knowing what it is and how it works can make the process safer and less confusing for beginners.
What fake skin is and how it works in special effects makeup
Fake skin is a layer that sits on top of real skin, built to change its surface. In films, artists often use it to form wounds or unusual textures. The material does not blend into the body but rests lightly, shaping an illusion.
Think of it as a mask, only smaller and more flexible. Some formulas stretch and move with the face, while others stay firm to keep a sharp detail. By adding color or paint on top, the skin looks broken, old, or otherworldly.
Why fake skin is popular for Halloween looks
Halloween is all about transformation. With fake skin, a simple costume becomes far more convincing. A plain pirate may add a scar, while a ghostly figure might wear hollowed cheeks. These touches give stories a face people can see.
Children often ask for these effects because they mirror the characters they see in movies. The fake skin is easy to shape and can be kept simple, which makes it a favorite for parties and school plays as well.
Safety considerations when using fake skin on children and adults
Safety is the part most people forget. Some products may cause mild irritation, especially on sensitive or young skin. Reading labels and testing a small spot first is always wise.
Adults and teens should also avoid leaving fake skin on for too many hours. Skin needs air, and makeup should be removed gently. Dermatology studies note that long contact with heavy layers can dry the surface and block pores (American Academy of Dermatology, 2023).
Essential Materials for Making Fake Skin Effects
Before creating fake skin, it helps to know what materials are used. Professional artists rely on tested formulas, while families may need safer versions for children. Tools also matter, since the way skin is applied changes the final look.
Common ingredients used in professional special effects fake skin
In film and theater, fake skin is often made from liquid latex. It dries into a thin layer that bends with the face. Gelatin is another choice, warmed until soft and then cooled on the skin. Both allow paint or blood effects to be added on top.
Some experts also use silicone. It gives a more flexible finish and can last longer under lights or sweat. However, these materials may not suit everyone, especially those with allergies. Professionals usually test small areas first before a full design.
Safe, child-friendly options for costume play
For children, softer formulas are often better. Water-based gels and special Halloween makeup kits are usually gentle and easier to wash off. They do not cling tightly and can be removed with mild soap.
Parents often prefer these because they avoid strong odors or harsh adhesives. The result may not last as long as latex or silicone, but it is safe for a few hours at a party or trick-or-treat night.
Tools you’ll need for application (brushes, sponges, spatulas)
The right tools make fake skin easier to handle. Sponges help press layers smoothly against the face. Brushes work well for painting fine cracks or scars. A flat spatula can shape edges so they blend with real skin.
Even a beginner can improve results by keeping tools clean. Makeup artists recommend washing sponges and brushes after use to prevent bacteria buildup (MUA Hygiene Guidelines, 2021). This habit protects both the skin and the next design.
How to Make Fake Skin for Halloween Easy Step by Step
A calm setup and simple steps make fake skin effects safer and faster. Prepare the space first, then build thin layers, and finally add small details. Each stage matters. With clean tools, soft pressure, and patience, even beginners get steady results.
Preparing your workspace before starting
Choose bright, even light and good airflow. Cover the table with paper or a mat. Tie back hair. Wash hands. Lay out products, cotton swabs, tissues, and a small trash bag so you don’t hunt for tools mid-application.
Do a quick patch test on the inner arm and wait a short while. If there’s stinging or redness, stop. Keep water and gentle cleanser nearby. For kids, set a time limit for wear and avoid the eye and lip areas.
Decant product onto a clean palette. Avoid double-dipping to keep jars sanitary. Disinfect spatulas and wipe brushes between uses. This simple hygiene loop lowers the chance of irritation later.
Simple layering techniques for realistic skin texture
Start on clean, dry skin. If the product allows, apply a light barrier moisturizer and let it sit. Using a sponge, press on a very thin layer of your SFX skin product. Feather the edges so they fade into real skin.
Let each layer set before adding the next. Thin beats thick. Build two or three passes, touching lightly with a stipple motion to avoid streaks. A flat spatula can smooth high spots without dragging.
For texture, tap with a porous sponge or press fine mesh gently, then lift. Set with a small amount of translucent powder if the product system permits. This keeps shine down and preserves detail.
Adding wrinkles, scars, or raised surfaces with ease
For wrinkles, ask the wearer to make the expression—frown, squint, or smile. Apply a thin film along the fold lines. Smooth outward, let it set, then relax the face. The lines read as natural creases.
For scars, lay a slim ridge of product, about thread-thin. Blend both edges flat with a spatula so only the center stands proud. Soften with a damp sponge. Keep lengths short on young skin to reduce tug.
For raised spots or ridges, use a small bead of modeling wax or a compatible gel. Anchor it, then blend edges to zero. Avoid stretching the skin. If any burning or itch starts, remove gently and stop the look.
Coloring and Shading Your Fake Skin for Realism
Once the base is set, color brings the fake skin to life. A soft hand makes all the difference. Start light, layer slowly, and step back often. It’s easier to add more pigment than to remove too much.
Using skin-tone pigments for a natural base
Begin with a mix close to the wearer’s natural shade. Apply sheer layers with a sponge, not heavy coats. Blend from the fake skin into real skin to avoid sharp lines that break the illusion.
A dab of yellow or peach can warm up cooler tones, while a touch of brown or gray softens edges. Test on a small patch first. Keep colors matte to avoid shine, unless the effect calls for wet or glossy skin.
Creating bruises, burns, or zombie effects with safe colors
For bruises, start pale yellow, then add soft green, then faint purple. Use feathered edges so no color ring looks drawn on. For burns, red tones go at the center, edged with darker brown or black for charred looks.
Zombie skin works best with muted greens, grays, or blue tints. Keep them thin and uneven to mimic decay. Always choose child-safe, non-toxic colors designed for face or body paint, never art supplies.
Shading tips for beginners to avoid overdoing the look
Hold the brush far back so strokes stay light. Shade in short passes, checking the effect in both daylight and indoor light. Less pressure often reads more realistic on skin.
If things look too dark, soften with a sponge or dust with powder. Step back after every few strokes. Remember, uneven skin is normal—perfectly even paint may look fake instead of real.
Special Effects with Fake Skin for Halloween Makeup
Once the base and color are in place, details make the skin effect stand out. Scars, cuts, or stitched edges add drama without needing complex tools. Always remember safety first, especially with kids.
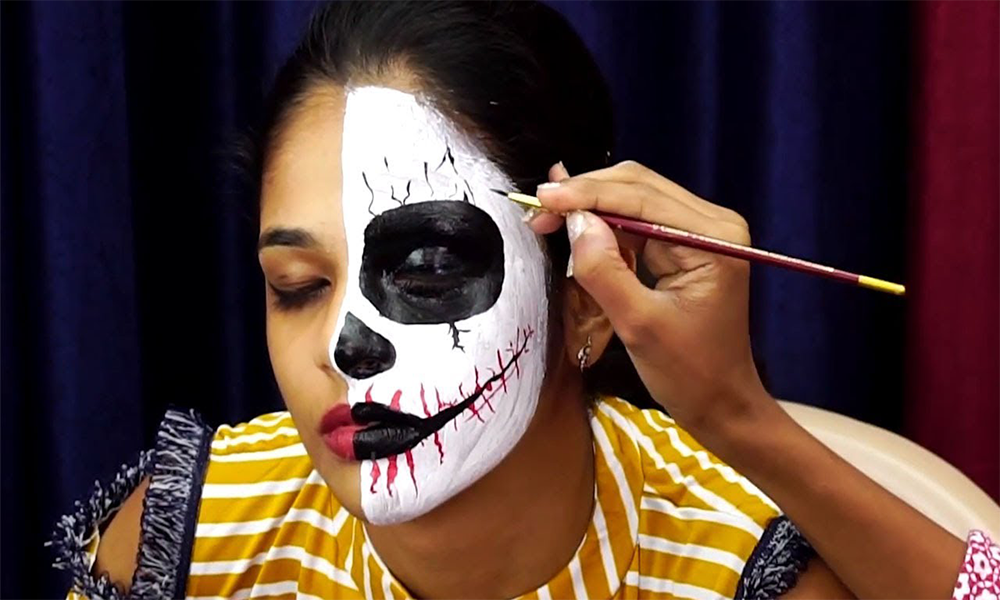
Making scars and scratches look realistic
To build a scar, apply a thin raised strip of fake skin, then blend the sides into the real skin. Shade with red or brown at the center and soften the edges with skin tone. Keep the lines uneven, since scars rarely form straight.
For scratches, drag a toothpick or spatula lightly through soft fake skin. Dust a little dark pigment into the grooves. A small touch of red paint adds depth, while a bit of purple can mimic healing tissue.
Creating wounds or gory textures safely
Start by lifting small areas of fake skin with a spatula to form edges, then shade inside with darker reds or blacks. This gives the illusion of depth. Blending outward with lighter tones helps the wound look more natural.
To keep it safe, avoid adhesives or pigments not made for skin. Non-toxic water-based paints are best. If applying on children, keep wounds smaller and less layered to prevent discomfort during removal.
Adding small props like fake glass or stitches
Props give fake skin an extra punch. Press lightweight items, like craft-safe plastic shards, into the fake skin while it’s soft. Blend edges around them so they appear embedded.
For stitches, lay a line of fake skin, make small slits, then insert short threads or cords. Darken the skin around them with shading to highlight tension. Keep props soft and lightweight so they sit comfortably on skin.

Application Tips for Beginners and Kids
Applying fake skin does not have to be messy or stressful. With a little planning and the right approach, even kids can enjoy Halloween makeup safely and comfortably.
How to apply fake skin easily without mess
Set up a clean table with wipes, tissues, and a mirror before starting. Scoop small amounts of fake skin and warm it slightly between fingers so it spreads evenly.
Using a sponge or spatula keeps hands clean and makes layers smoother. Work in small sections instead of rushing all at once to reduce clutter and sticky surfaces.
Blending edges into natural skin tone
The edge is where fake skin looks most obvious. To soften it, thin out the material at the borders until it fades into real skin. A damp sponge works well here.
After blending, apply a skin-tone pigment or powder around the edges. This helps erase the line between real and fake, making the effect more convincing.
Avoiding discomfort during long wear
Fake skin should never feel heavy or tight. Apply thin layers, especially on kids, so skin can breathe. Avoid sensitive areas like around the eyes or lips.
Take short breaks if wearing it for many hours. At the end of the night, remove gently with warm water and mild cleanser so the skin does not get irritated.
Safety First: Skin-Friendly Practices for Halloween Makeup
Fake skin can look amazing, but it must be safe too. A few simple habits help keep both kids and adults comfortable while enjoying Halloween makeup.
Patch testing before applying fake skin
Before covering the face or hands, test a small bit on the inner arm. Wait at least 20 minutes to check for redness or itching. If nothing happens, it’s safe to use.
This step is important for children, since their skin can react faster. Skipping it may cause rashes that ruin the fun of the night.
Choosing age-appropriate fake skin materials
Some fake skin products are designed for professional use and may be too strong for kids. Always check labels for safe, child-friendly formulas.
Lightweight latex-free options are best for younger users. They stick well but come off without pulling or stinging.
Avoiding sensitive areas like eyes and lips
Never apply fake skin too close to the eyes or directly on lips. These areas are thin and can dry out quickly.
Instead, focus on cheeks, forehead, or arms. The look still feels spooky without risking discomfort.
Removing Fake Skin Safely After Halloween
Taking fake skin off is just as important as putting it on. Removal should be gentle so the skin stays calm and ready for the next day.
Gentle removal methods that protect the skin
Start by softening the fake skin with warm water or a mild oil-based remover. Peel slowly from the edges rather than pulling in one motion.
For children, a parent should assist to avoid tugging too hard.
Cleansing steps to avoid irritation
After removal, wash the area with a gentle cleanser and lukewarm water. This helps clear away leftover pigment or adhesive.
Skip harsh scrubs or alcohol-based wipes, as they dry out the skin and may sting.

Moisturizing the skin after makeup removal
Once the skin is clean, pat it dry and apply a light moisturizer. This restores hydration lost during makeup wear.
A fragrance-free lotion is usually best, especially for kids with sensitive skin.
Creative Halloween Ideas with Easy Fake Skin Effects
Fake skin is not only for horror movies. With simple steps, it can transform any Halloween look, from creepy monsters to playful designs for kids.
Zombie looks for kids and adults
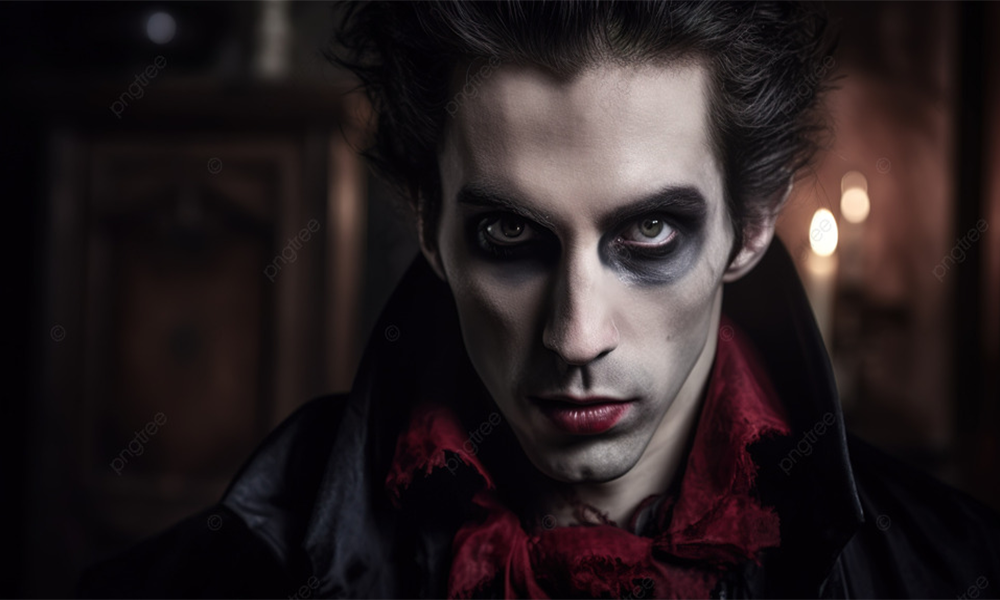
A classic choice is the zombie. By adding a pale base and a few scars, you get the “undead” vibe. Dark shading under eyes makes it even spookier.
For kids, keep the effect lighter—maybe a small scratch or faded bruise—so the look stays fun and not too intense.
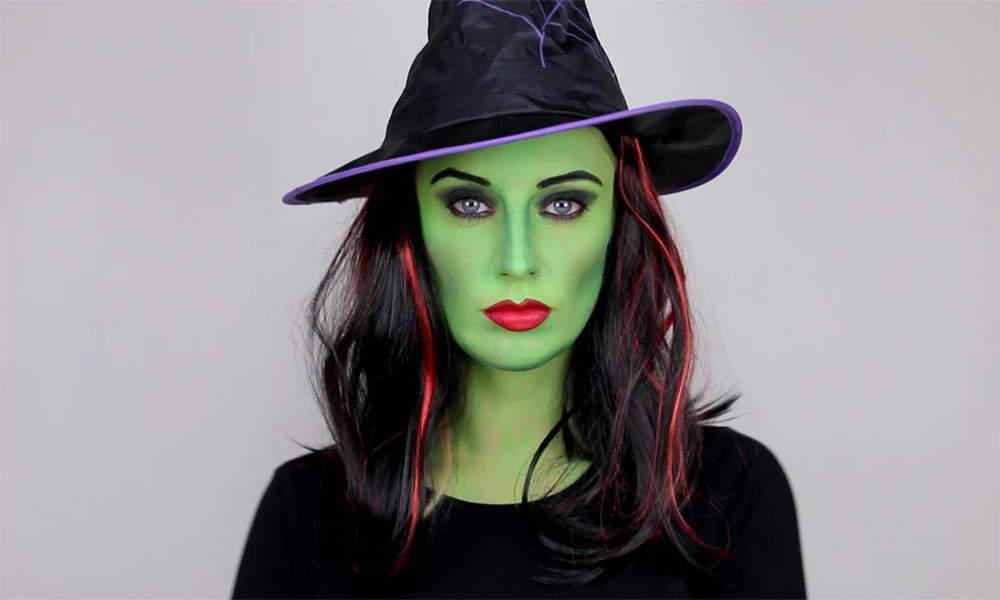
Witch, ghost, or monster transformations
Fake skin can build a crooked nose for a witch or raised bumps for a monster. Even ghosts can benefit from cracks or rough textures.
Adding small details with shading brings these characters to life while still being safe for children’s skin.
Fun but less scary designs for younger children
Not every child likes spooky effects. Simple fake skin bumps shaped like stars or swirls can be playful instead.
These designs allow kids to join in Halloween makeup without feeling frightened by blood or gore.
Troubleshooting Common Beginner Mistakes
Even with simple methods, fake skin can be tricky. A few common problems have easy fixes, so beginners can keep their Halloween look on track.
What to do if fake skin looks too thick
If the layer is bulky, press it down gently with a sponge. Adding a drop of water can smooth the surface.
For a quick fix, scrape off the extra with a spatula and reapply in thinner layers.
Fixing color mistakes or uneven blending
When colors look patchy, dab with a clean sponge to blend them together. Adding a light layer of skin-tone pigment helps cover mistakes.
If it still looks uneven, turn the flaw into a scar or bruise—it can become part of the design.
Preventing fake skin from peeling off too early
Sometimes fake skin loosens while wearing. To avoid this, press the edges firmly during application.
If peeling starts later, add a small dab of safe adhesive or re-blend with makeup. This trick keeps the design in place longer.

Conclusion
Creating fake skin for Halloween can be simple, safe, and fun for beginners and kids alike. By understanding materials, using gentle tools, layering carefully, and adding realistic shading, anyone can achieve spooky or playful effects. Following safety practices and proper removal ensures a fun, irritation-free experience, letting creativity shine each Halloween.


